
In this tutorial, I will share my impression of the vibe.d web framework which is built in the D programming language.
Keywords
-
D is a statically type general purpose programming language with a c-like syntax and awesome modern features that makes programming easy and fun. It is the most “beautiful” programming language I have seen. The D compiler is available for Linux, Windows, MacOS, etc.
-
Dub is a package manager and build tool for the D programming language. I will use dub to fetch the vibe.d package from the D packages registry at https://code.dlang.org.
-
Vibe.d is web framework that take advantage of the native speed, the easy-to-understand syntax and high-level features of D like fibers. Vibe.d is to D what Node JS is to JavaScript (EcmaScript). Vibe.d is very fast.
“So why vibe.d?”
The answer is in the speed benchmark below. 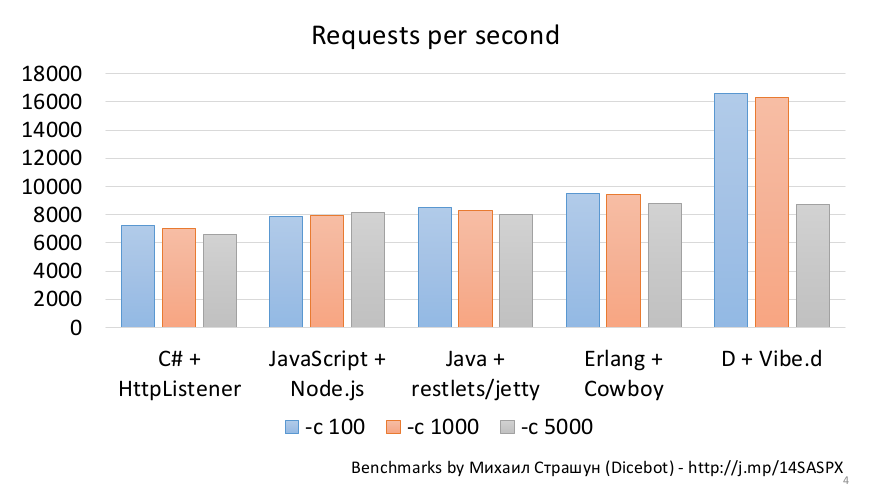
Setting up your development environment
My working environment for this tutorial is Ubuntu Linux 14.04, but you can use Windows, MacOS, etc. as well by installing the D compiler and dub from https://dlang.org/download.html. Dub and the D compiler are available for Ubuntu version 16.04 and above in the software repository, so just run sudo apt install dub. Note that I will be using dub to build the app in the command-line :) Vibe.d on Linux requires some dependencies which you can install using sudo apt install -y libssl-dev libevent-dev on Debian based Linux Distributions or sudo dnf install –y openssl-devel libevent-devel libcurl-devel for Fedora based Linux distribution.
Creating a vibe.d project using dub
To create a vibe.d project, run dub init helloworld --type=vibe.d in the command-line at the location where you want the project to be created. In my case it will be /home/aberba/workspace/d/
After running this command, dub will take you through a process where you provide information for customizing your project build system such as Project Name, dependencies, Author Name, etc. I will just enter a description and press ENTER to apply the default for the rest.
aberba@mx:~$ dub init helloworld --type=vibe.d

Package recipe format (sdl/json) [json]:

Name [helloworld]:

Description [A simple vibe.d server application.]: A simple web app

Author name [Lawrence Aberba]:

License [proprietary]:

Copyright string [Copyright © 2016, Lawrence Aberba]:

Add dependency (leave empty to skip) []:

Successfully created an empty project in '/home/aberba/workspace/d/helloworld'.
Package sucessfully created in helloworld
After completing the process, dub will generate the template for a vibe.d project similar to what you see below;
aberba@mx:~/workspace/d/helloworld$ ls

dub.json  public  source  views
The source folder which currently contains app.d is where the source code will be placed, the views folder is where you place all your diet templates. Diet. is the default template system for vibe.d and the syntax is similar to Jade. The public folder is where all your CSS, JavaScript and images will be placed and served. When used, diet templates will also generate HTML files during code compilation and placed in the public folder. When you open the dub.json is your code editor, it will have content similar to this;
{
    "authors": [
        "Lawrence Aberba"
    ],
    "description": "A simple vibe.d server application.",
    "name": "helloworld",
    "dependencies": {
        "vibe-d": "~>0.7.26"
    },
    "license": "proprietary",
    "copyright": "Copyright © 2016, Lawrence Aberba",
    "versions": [
        "VibeDefaultMain"
    ]
}
This is how the dub build system configured, similar to Node JS package.json. The dependencies section indicates the version of vibe.d, in my case version 0.7.26. You can learn more about dub at http://code.dlang.org/getting_started.
The source code is located in the source folder, where I currently have just an app.d file. app.d is the entry file for a vibe.d app. The code inside is like;
import vibe.d;

shared static this()
{
    auto settings = new HTTPServerSettings;
    settings.port = 8080;
    settings.bindAddresses = ["::1", "127.0.0.1"];
    listenHTTP(settings, &hello);

    logInfo("Please open http://127.0.0.1:8080/ in your browser.");
}

void hello(HTTPServerRequest req, HTTPServerResponse res)
{
    res.writeBody("Hello, World!");
}
You first import the package for the vibe.d web framework using import vide.d. The D module import syntax is import package_name to import a package along with all modules in it, or import package_name.module to import a specific module. In this code I am importing the module d.
In a normal D program, you would write a main() function which will serve as the entry point of the program, but vibe.d does this behind the scene. All you have to do is to put the entry point code in a shared static this() function (module constructor). Next you configure the vibe.d port and IP address(es) settings using HTTPServerSettings class;
auto settings = new HTTPServerSettings;
settings.port = 8080;
settings.bindAddresses = ["::1", "127.0.0.1"];
The auto keyword is a way to tell the compiler to detect (infer) the type of settings at compile-time, just like writing;
HTTPServerSettings settings = new HTTPServerSettings
As you can see, it is much easy to write auto instead of the long version. We then assign the addresses ::1 and 127.0.0.1 and port 8080 (IPv4, IPv6 and domain names are all supported). The listenHTTP() function, which starts the server, takes settings and a pointer to the function which will handle incoming HTTP requests, in this case a pointer to hello().
Now you can compile and run the project by running dub in the command line which will automatically fetch all the dependencies from the dub registry (so make sure you have Internet connection). The output on the command-line will look similar to this;
aberba@mx:~/workspace/d/helloworld$ dub
Performing "debug" build using dmd for x86.
vibe-d:utils 0.7.29: building configuration "library"...
vibe-d:data 0.7.29: building configuration "library"...
vibe-d:core 0.7.29: building configuration "libevent"...
vibe-d:http 0.7.29: building configuration "library"...
vibe-d:diet 0.7.29: building configuration "library"...
vibe-d:mail 0.7.29: building configuration "library"...
vibe-d:mongodb 0.7.29: building configuration "library"...
vibe-d:redis 0.7.29: building configuration "library"...
vibe-d:web 0.7.29: building configuration "library"...
vibe-d 0.7.29: building configuration "libevent"...
helloworld ~master: building configuration "application"...
Linking...
Running ./helloworld
Listening for requests on http://[::1]:8080/
Listening for requests on http://127.0.0.1:8080/
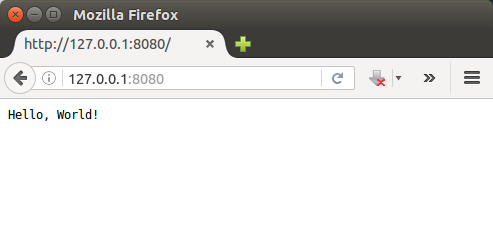
Please open http://127.0.0.1:8080/ in your browser.
Pretty neat! Now open your browser and enter http://127.0.0.1:8080/ into the address bar.
Routing requests and using Diet templates
In example above, every request is handled by the hello() function which always send back the text Hello, World!. Since we don’t normally want to handle every request the same way in a web app, we will have to provide a way to handle different request. Using the URLRouter class in vibe.d is one way we can route request (GET, POST, etc) for cases where a user browses to /, /users/12, etc. URLRouter class provides a convenient way to assign functions to handle different URLs. We will also utilize the vibe.d diet templates.
import vibe.d;

shared static this()

    // We are now using URLRouter here
    auto router = new URLRouter;
    router.get("/", &index);

    auto settings = new HTTPServerSettings;
    settings.port = 8080;
    settings.bindAddresses = ["::1", "127.0.0.1"]

    // We are now passing router to listenHTTP()
    listenHTTP(settings, router);
}

// I now renamed hello() to index() and changes the content
void index(HTTPServerRequest req, HTTPServerResponse res)
{
    res.render!("index.dt");
}
As you can see, the URLRouter class instance, router, registers an HTTP GET request with router.get() which receives a URL as first parameter and a pointer to the function to handle the request as the second parameter. I my case, I passed the pointer to index() which is a modifies version of hello() from the first demo. The render() method of HTTPServerResponse res is then used to render the diet template, index.dt, which I created in the views folder. The ! symbol is a way to specify compile-time arguments in D a.k.a. templates. Dub will take care of fetching and compiling diet templates from the views folder. Notice that the listenHTTP() function will now take router as the second argument (not a pointer like &router). The content of the index.dt file is as follows;
doctype html
html
    head
        title Vibe.d Demo app
    body
        h1 Hello, World!
Diet template syntax is just like Jade. Aside the Doctype declaration, every other first word in a line is interpreted as an HTML tags. Parent tags are determined by their indentation level. You can check the diet template documentation at http://vibed.org/templates/diet for more information.
Now let’s see how you can route request for a URL like /users/3, where 3 is the ID of a specific user. First we set a route for /users/3 using router and assign a function which I named user. I will place the route right below router.get("/", &index).
...
router.get("/users/:id", &user);
We then create the user function.
void user(HTTPServerRequest req, HTTPServerResponse res)
{
    auto user_id = req.params["id"];

    // Assuming you fetched user information from
    // a database, REST API, etc. using "user_id"
    string name = "John Doe";
    int age = 25;

    res.render!("user.dt", user_id, name, age);
}
As you can see from the code, URL queries are populated in req.params where we get access to ID using req.params["id"]. You can then fetch user information from a file, database, REST API, etc. Vibe.d has built-in drivers for Redis and Mongo DB. There are also vibe.d drivers for other databases in the dub registry. Assuming we fetched the data using user_id, we can now pass that information to the diet template in the res.render() method as arguments which will be evaluated during compilation of the diet templates.
We now have to create the user.dt template file which we will pass to the res.render() method.
doctype html
html
    head
        title User Profile Page
    body
        h1 User Profile
        p This is the profile of user with ID: #{user_id}

        ul
            li User Name: #{name}
            li Age: #{age}
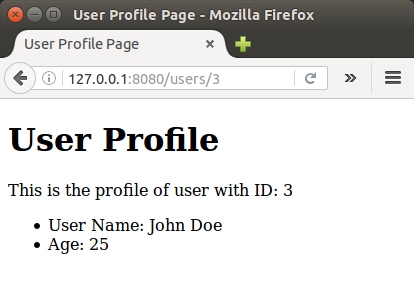
In diet template, you can access the value a variable in D when passed to the res.render() method. Using the #{ VARIABLE } expression as seen in the li tags will output the value. Now when you re-run dub in the command-line and browse to http://127.0.0.1:8080/users/3 in your browser you should see the generate page.
Sweet! Vibe.d is easy to use and straight forward. I recommend it if you want a web framework which is fast and scalable.
Reference Materials
The D website has a Getting Started Tour for the D programming language where you can run D code alongside. A Vibe.d Tour tour is also available among others tours (located a the top navigation of the tours page ).
You can also see organisations using D including eBay, Facebook, Remedy Games at https://dlang.org/orgs-using-d.html. The Current D Use page also features what organisations are using D to build. The community forum is also at http://forum.dlang.org